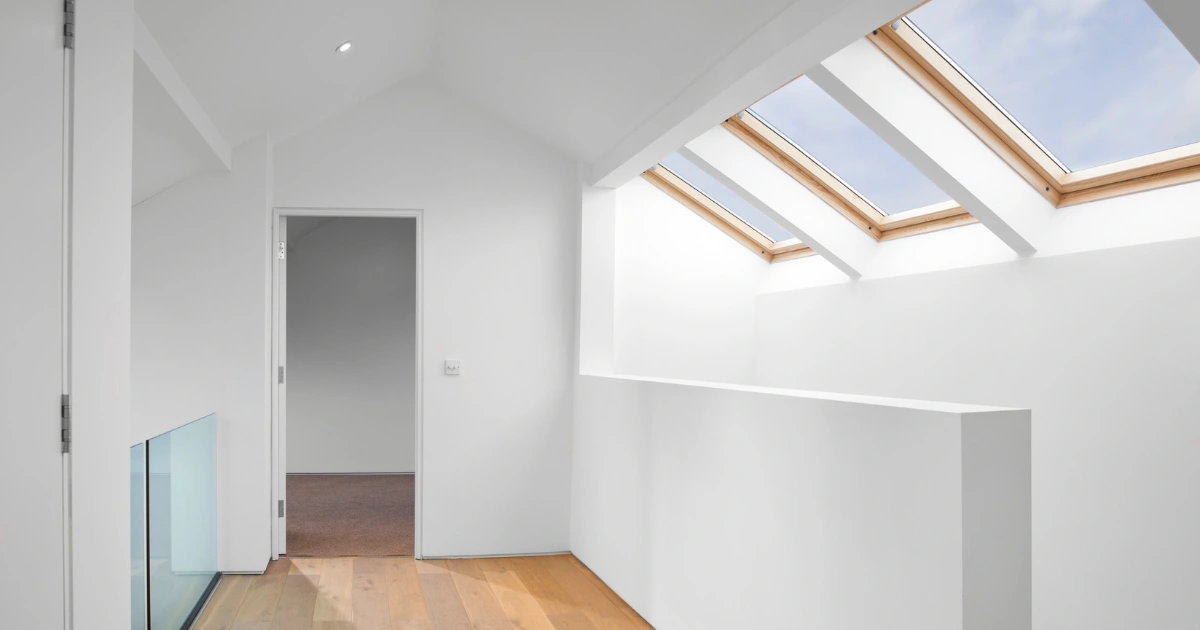
What is a rooflight loft conversion?

A rooflight loft conversion is one of the simplest and most cost-effective ways to transform an unused attic into a bright, usable space. Rather than altering the roof’s shape or height, it adds roof windows directly into the existing slope, allowing natural light to enter while keeping the exterior almost unchanged.

Unlike dormer, mansard, or hip-to-gable conversions, a rooflight design does not extend the roof structure or increase the overall volume of your home. This makes it ideal for properties that already have enough headroom and where planning restrictions prevent major external changes.

The main appeal is its simplicity. Installation is quick, there’s minimal disruption, and the overall cost is far lower than other types of loft conversions. Rooflights can turn a dark, unused loft into a comfortable bedroom, a quiet home office, or a practical storage area, all while preserving the character of your property.

However, because the roofline remains the same, the available floor space does not increase. For that reason, rooflight conversions work best in lofts with good existing height, typically at least 2.2 metres at the highest point.

How much does a rooflight loft conversion cost?

A rooflight loft conversion is one of the most affordable ways to add usable space to your home. Because it works within the existing roof structure, costs are lower than other types of conversions like dormer loft conversions or mansards. A straightforward rooflight conversion costs between £15,000 and £30,000, depending on size, finish, and location.

Type of Rooflight Loft Conversion Typical Cost (Excluding VAT) Description
Small loft (storage or office) £15,000–£20,000 Basic fit-out with two roof windows, insulation, flooring, and access ladder.
Standard loft (bedroom or small ensuite) £20,000–£25,000 Includes full staircase, electrics, plastering, and 3–4 rooflights.
Premium loft (high-spec design) £25,000–£30,000+ Upgraded finishes, large rooflights, bespoke joinery, and a possible ensuite.

What affects the cost of a rooflight loft conversion

Several factors can influence the total price of your rooflight loft conversion:

Rooflight windows

The number, size, and quality of rooflights make a big difference. Standard Velux windows start from around £700 to £1,000 each, while larger or electric models with triple glazing can exceed £1,500 per unit.

Structural work

Most rooflight conversions require only minimal structural changes, but strengthening existing joists or adding steel beams for load support can add £1,000-£3,000 to the budget.

Insulation and roofing materials

Proper insulation, vapour barriers, and roof lining are vital for meeting building regulations and ensuring comfort. Expect this stage to cost between £1,500 and £3,000, depending on materials and the roof size.

Stairs, flooring, and internal fit-out

Installing a permanent staircase, flooring, and internal finishes such as plastering, lighting, and sockets typically costs £4,000-£8,000. Adding a small en-suite bathroom can increase the cost by an additional £3,000-£5,000.

Design and professional fees

Architectural design, structural calculations, and building control approvals usually cost £1,000-£2,500 combined. It’s a small but essential part of keeping the project compliant and safe.

Contingency

Always set aside at least 10% of your budget for unexpected issues, such as replacing damaged timbers or upgrading old electrics uncovered during the build.

Regional cost variation

Costs vary across the UK. In London and the South East, prices are typically 10-20% higher due to labour rates, access restrictions, and higher material costs. In northern regions or rural areas, you may pay slightly less, although transport or specialist access (such as cranes in tight areas) can offset some of these savings.

Looking for a new loft conversion?

Discover how much loft conversions cost and compare quotes from trusted specialists

Get An Instant Quote

When is a rooflight loft conversion a feasible option?

A rooflight loft conversion works best when your existing roof already has enough space and structural strength to be made habitable without altering its shape. Before committing to plans or quotes, it’s worth checking a few key points to see whether your home is suitable.

Minimum headroom

You’ll need at least 2.2 metres of clear height from the floor joists to the ridge beam across a good portion of the loft. Anything lower will feel cramped once flooring and insulation are added, and may require a dormer or full roof lift instead.

Roof pitch and slope

Steeper roofs are ideal for rooflight conversions because they naturally offer more usable height. A pitch of 35 degrees or more provides the best balance between space and comfort. Shallow or low-pitched roofs can limit standing room and usable floor area.

Roof structure type

Traditional cut roofs, built with individual rafters and purlins, are generally easier to convert because they leave open space in the centre. Trussed roofs, common in post-1960s homes, utilise a web of diagonal supports that often require reinforcing or partial removal before conversion.

Obstructions and layout

Check for chimneys, water tanks, flues, or structural beams that could restrict layout or head height. These can often be relocated or boxed in, but they add to cost and complexity.

Structural strength

Your existing ceiling joists are unlikely to support the weight of a new room. A structural engineer or loft specialist will assess whether you need new floor joists or steel beams to ensure compliance with building regulations.

Planning and location constraints

Most rooflight loft conversions fall under permitted development rights; however, homes in conservation areas, listed buildings, or flats require full planning permission. Always confirm with your local authority before starting work.

When a rooflight isn’t enough

If your roof lacks height or usable space even after assessment, you may need a mansard loft conversion, dormer, or hybrid design that extends the roofline. These options provide additional headroom and floor space but come at a higher cost.

Rooflight loft conversion

Rooflight loft conversion and planning permission

Most rooflight loft conversions fall under permitted development rights, meaning you usually don’t need full planning permission. This applies as long as the project doesn’t alter the existing roof shape or height and the rooflights sit flush with the roof slope, projecting no more than 150 mm from the surface. Side-facing windows must use obscure glazing and be non-opening below 1.7 m from the floor to protect privacy.

Planning permission is required if your home is in a conservation area, is listed, or if you plan to raise the roofline or add dormers that change the property’s external appearance. Even when formal permission isn’t needed, all rooflight conversions must still comply with building regulations covering structure, insulation, fire safety, and access.

For peace of mind, many homeowners apply for a Lawful Development Certificate to confirm that their rooflight conversion is officially classed as permitted development.

Rooflight loft conversion key design and construction considerations

A rooflight loft conversion might look simple from the outside, but good design and detailing make all the difference. From where you place the windows to how you insulate and strengthen the roof, every decision affects comfort, light, and long-term performance.

Rooflight placement and glazing area

Getting the position and size of your rooflights right is essential for both light levels and appearance. As a rule of thumb, the total glazed area should equal around 15-20% of the loft’s floor area to achieve balanced daylight. Rooflights are typically installed on both sides of the roof to evenly distribute light across the room.

Place roof windows higher up the slope for privacy and better sky views, and align them symmetrically if you have more than one. Select a combination of opening and fixed rooflights to achieve natural ventilation and control. Electric or solar-powered openers can make access easier, especially on steep or high-pitched roofs.

Insulation, U-values and thermal performance

Building regulations require loft conversions to meet strict U-values, usually around 0.18 W/m²K for pitched roofs. This means your roof must be properly insulated to prevent heat loss. The two main methods are warm-roof insulation, which is fitted above the rafters to keep the entire structure warm, and cold-roof insulation, placed between and below the rafters.

Warm-roof systems are more efficient but cost slightly more. Cold-roof builds are common in smaller rooflight conversions, but they must include ventilated air gaps to prevent condensation. Rigid PIR boards, multifoil insulation, and breathable membranes are popular options for their high performance and thin profile.

Structural reinforcement and roof strengthening

Structural reinforcement and roof strengthening of a rooflight loft conversion

While rooflight conversions involve less structural work than dormers, some reinforcement is still necessary. When adding windows, rafters may need to be trimmed or doubled up to support the new openings. A structural engineer should confirm the roof’s load paths and whether any additional steel beams or purlins are required to distribute weight safely.

You’ll also need to strengthen or replace ceiling joists if they aren’t designed to carry the extra load of a habitable floor. Skipping this step can cause sagging ceilings or cracked plaster later on.

Headroom, floor layout and circulation

Because a rooflight loft keeps the original roofline, space planning becomes crucial. The usable floor area is defined by sections where you can comfortably stand, typically anything above 1.8 m in height. Position the bed, desk, or seating under the tallest part of the roof and use the lower slopes for storage or built-in units.

If your loft is accessed by a staircase, its placement must allow safe headroom at the top landing (minimum 2 m clearance). Compact or alternating tread stairs can save space, but they must still comply with building regulations.

Ventilation, drainage and water tightness

Proper ventilation prevents condensation and keeps the roof structure dry. All rooflight units should include trickle vents and, where possible, be positioned to allow cross-flow ventilation between openings. Around the rooflights, watertight detailing is vital; use lead or proprietary flashing kits to seal edges and direct water away from the frames.

Gutters, downpipes, and roof membranes should also be checked during installation to ensure water drains freely. Any lapse in sealing can lead to leaks that are expensive to repair later.

Fire safety, escape and building regulations

Every loft conversion must comply with Part B of the Building Regulations, which covers fire safety and escape routes. Rooflight windows in habitable rooms should act as an emergency exit, with an unobstructed opening of at least 0.33 m² and a minimum 450 mm height and width.

Fire-resistant doors, smoke alarms, and protected stairways are also part of compliance. Building control inspectors will check these during the approval process. If your property is more than two storeys high, you’ll need extra fire protection measures such as sprinklers or a dedicated fire escape window route.

Pros, cons and when not to choose a rooflight loft conversion

A rooflight loft conversion can be the simplest and most affordable way to bring a loft space to life, but it isn’t always the right choice. Before you commit, it’s worth weighing up both the benefits and the limitations, and knowing when another type of conversion might work better.

Pros of a rooflight loft conversion

A rooflight loft conversion offers a clean, cost-effective way to transform unused attic space into something bright and inviting. Because it works with your existing roof structure, it’s one of the least invasive types of conversion, ideal if you want extra space without major building work.

  • Lower cost and disruption: Since there’s no need to alter the roof structure, a rooflight loft conversion is one of the most cost-effective options. Installation is quick, clean, and causes minimal mess compared to dormer or mansard builds.
  • Maintains external roofline: Your home’s exterior remains largely unchanged, which makes this type ideal for period or listed properties where appearance matters.
  • Excellent natural light: Rooflights flood the space with daylight, creating a bright and open atmosphere. The sloped glazing brings in up to 40% more natural light than vertical windows.
  • Faster build time: Most projects are completed in just a few weeks, thanks to the reduced structural work and straightforward installation process.

Cons and limitations of a rooflight loft conversion

While rooflight conversions have numerous advantages, they also have a few practical limitations. Understanding these early helps you decide whether this style will meet your needs or if another type of loft conversion would suit your property better.

  • No extra headroom or floor area: Since the roofline stays the same, you gain no additional height or usable floor space. This limits furniture placement and can make the room feel smaller than other types of conversions.
  • Unsuitable if headroom is insufficient: Rooflight conversions need a minimum head height of around 2.2 metres. Anything less may make the space uncomfortable to use.
  • Potential for heat gain or loss: Large rooflights can cause overheating in summer and heat loss in winter unless fitted with high-performance glazing and proper shading.
  • Structural restrictions: Older roofs or trussed designs may need reinforcement to accommodate the new openings, adding cost and complexity.

When to consider an alternative conversion

A rooflight conversion is ideal when your loft already has sufficient height and you primarily want light and comfort rather than a major structural alteration. However, consider other options if:

  • You need more usable floor space, headroom, or standing height throughout.
  • The roof shape or pitch means natural light is still limited, even with rooflights.
  • You want to add a bathroom, master suite, or full living area, which often requires dormer or mansard extensions.
  • Your property is in a conservation area or has planning restrictions on visible rooflight placement.

In short, a rooflight loft conversion is the perfect balance of simplicity and value when your loft already has sufficient space. However, if it doesn’t, a dormer or mansard design may offer the flexibility you need.

FAQs on rooflight loft conversions

Rooflight loft conversions are one of the most straightforward ways to utilise loft space, but it’s normal to have questions before starting. From planning rules and roof pitch limits to how rooflights affect energy use, these are the most common queries homeowners ask, answered clearly and simply.

Do rooflight conversions need planning permission?

In most cases, no planning permission is needed for a rooflight loft conversion. These projects typically fall under permitted development rights, provided the roofline isn’t altered and the windows don’t project more than 150mm from the roof surface.

You will, however, need permission if your property is listed, in a conservation area, or if the rooflights are being added to the front-facing slope of the roof. Building regulations approval is still required to cover the structure, insulation, and fire safety.

What is the minimum roof pitch for rooflights?

Most rooflights are designed for roof pitches between 15 and 90 degrees, although some models can be fitted on shallower slopes using specialist upstands or kerbs. For a comfortable loft conversion, a roof pitch of 30-45 degrees is ideal, as it provides better headroom and allows more natural light through the rooflights.

Can I add a rooflight conversion to a flat roof or shallow pitch?

Yes, but it depends on the design. For a flat roof, you’ll need flat roof skylights or lanterns mounted on raised upstands to prevent water pooling and ensure drainage. On low-pitch roofs (below 15 degrees), only certain rooflight systems are suitable, so you’ll need products specifically rated for shallow slopes. It’s always best to have a roofer or structural specialist confirm the suitability of your roof before installation.

Do rooflights in a loft conversion need a FENSA certificate?If your rooflights are installed as part of a loft conversion, they typically don’t require a separate FENSA certificate; however, they must still comply with building regulations.

FENSA certificates apply to window replacements in existing openings, not to new structural installations created as part of a building project. During a loft conversion, your Building Control officer or Approved Inspector will verify that the rooflights comply with all thermal, structural, and fire escape requirements as part of the overall sign-off process.

That said, if you ever replace those rooflights in the future (outside of a larger building project), the replacement work must be carried out by a FENSA-registered installer or separately approved by Building Control.

How many rooflights do I need?

There’s no fixed number, but a good guideline is that the total glazed area should be around 15-20% of the floor area. For example, a 20 m² loft may require approximately 3-4 m² of glazing. Distributing rooflights evenly on both sides of the roof helps light the space naturally throughout the day.

Consider where sunlight hits your roof; south-facing slopes will get the most light, so fewer or smaller rooflights may be needed there.

How do rooflights affect energy bills?

Modern rooflights are designed with low-E coatings, double or triple glazing, and insulated frames to reduce heat loss. When properly installed, they can actually improve the energy efficiency of your loft by reducing the need for artificial lighting. However, poor-quality glazing or incorrect installation can lead to heat loss in winter or overheating in summer. Select high-performance rooflights with low U-values (around 1.4 W/m²K or lower) and consider adding blinds or solar control glass to manage heat gain effectively.

Can I walk on rooflights or use them as a rooflight balcony?

Standard rooflights are not designed to be walked on; however, walk-on rooflights do exist for use on flat roofs, balconies, or terraces. These are made from laminated, reinforced glass and have anti-slip finishes for safety.

If you want to create a rooflight balcony, you’ll need a specialist system such as a Cabrio or Juliet-style balcony, which opens outward to form a small standing space. Both options require a structural assessment and may require planning permission, depending on visibility and height.